#docker-compose stop
Explore tagged Tumblr posts
Visit Tumblr Blog
Explore Tumblr blogs with no restrictions, modern design and the best experience.
Last Seen Tumblr Blogs


Fun Fact
China blocked Tumblr because of pornography and censorship problems in 2013.
Text
How to host local Club Penguin Private Server (CPPS) on Silicon Mac (M1/M2/M3) thru play.localserver & Solero's Wand install.
I spent so long looking for a solution to this that I want to contribute what worked for me. I got so frustrated looking for something that worked, and I hope this guide will help others avoid that frustration.
This is NOT a guide on hosting or serving a CPPS. This is a guide on making a CPPS playable by locally hosting your server on your Silicon M1/M2/M3 Macbook. This worked on my M3 Macbook, and, in my experience, it seems the newer the hardware/operating system gets, the harder it is accomplish this.
DISCLAIMER *I do not know very much about this topic. I can paste commands into terminal and execute them, I know how to install DMG files I downloaded from the internet (the bar is in hell, I am aware), and I know how to enter play.localhost to run this in a browser. I am no expert; this guide is for beginners like myself who want a CPPS. This is beginner-level stuff. If you want advice or need help hosting, refer to the Wand Github page, Solero's Dash (an actual web-hosting solution for Houdini/Wand), Solero's discord, or, when in doubt, Google it. (I recommend only asking for help in Solero's discord for help AFTER trying your best to search for a solution, and even after that, trying to search key terms in their chat logs. They often have to repeat the same advice over, and over, and over again.)*
TLDR; IDK shit about shit
USING WAND INSTALLER
wand description from github: Wand makes it easy to configure dash, houdini and a media server utilizing docker & docker-compose.
All the assets are located here.
Installation instructions from the above link:
Installation script 1. run the script: bash <(curl -s https://raw.githubusercontent.com/solero/wand/master/install.sh) 2. Answer Questions which are: Database password (Leave blank for random password) Hostname (example: clubpenguin.com) (Leave empty for localhost) External IP Address (Leave empty for localhost) 3. Run and enjoy. Run this command: $ cd wand && sudo docker-compose up
The steps I took:
1. Install Docker via Terminal & Homebrew.
Installing the Docker DMG file did not work properly when I tried. I realized later that Docker is seperate from Docker Desktop (the DMG file). I got Docker to work by using Terminal to install Homebrew, and then using Homebrew to install Docker.
Indented text = paste into Terminal.
Command to install Homebrew:
/bin/bash -c "$(curl -fsSL https://raw.githubusercontent.com/Homebrew/install/HEAD/install.sh)"
Ensure Homebrew is installed:
brew --version
Install Docker:
brew install docker
Recommended: Install Docker Desktop (useful in determining if your server is running, stopped, or stuck in a restart loop).
brew install --cask docker
Run Docker Desktop:
open -a Docker
2. Run installation script:
bash <(curl -s https://raw.githubusercontent.com/solero/wand/master/install.sh)
From Github instructions:
Answer Questions which are:
Database password (Leave blank for random password)
Hostname (example: clubpenguin.com) (Leave empty for localhost)
External IP Address (Leave empty for localhost)
3. $ cd wand && sudo docker-compose up
This is what is provided in the Github. This command didn't work on Mac; I believe it's formatted for Linux OS. Here's how I broke it up and enabled it to run from Mac's Terminal.
Navigate to Wand directory:
cd wand
Double-check if you're in the right directory:
ls
Start Docker container:
docker-compose up
If the above doesn't work, try
docker compose up
or
brew install docker-compose
Takes a second...

Ensure Docker is running:
docker info
If it isn't, open the Docker Desktop application.
*After using compose up, this error may appear:*
WARN[0000] /Users/[user]/wand/docker-compose.yml: the attribute version is obsolete, it will be ignored, please remove it to avoid potential confusion
This is harmless. If you get annoyed by errors, this can be solved by:
nano docker-compose.yml

See Version 3.7 at the top? Delete that line.
Ctrl-X (NOT COMMAND-X) to exit, Y to save, Enter.
PLAY.LOCALHOST
Type http://PLAY.LOCALHOST into a browser.

Create a penguin.

Try logging in that penguin:

This step was agony. I'm not savvy with running obsolete or deprecated software, and, of course, Club Penguin (and Houdini/Wand's assest) uses Flash, which was discontinued, and timebombed by Adobe, in 2021.
I tried Ruffle. Club Penguin Journey uses Ruffle, so why can't I?
Running Ruffle in Firefox:


No luck.
In the Solero discord, they'll direct to this blog post:

This method does not work on Mac M1/M2/M3. The program is "out of date" and you cannot run it. It works on Macbook's running Sonoma and backward. I'm on an M3 running Sequoia.
they'll often post this video in the discord:

In theory, this method should work, and it does for many, but for whatever reason, not on my M3. I tried different versions of Ungoogled, I tried so many different patches of Pepperflash, and it never cooperated. I tried Pepperflash, I tried Fast Patch!, I tried dedicated Flash browsers, running Flash plugins for Pale Moon, Ungoogled, Waterfox, but I could never get past him.

Every time I see this stupid penguin's face I'm filled with rage. But I am going to save you that rage!!!
If you get this method to work, yay! I could not. Maybe I don't know enough about patching, maybe I'm a little tech stupid.
WHAT WORKED: Using a dedicated CPPS desktop application that allows you to plug in a URL.
I give you...

He is your solution, your answer to
I discovered this solution through Solero's Discord, when someone answered a question re: playing online.

Waddle Forever was not what I was looking forever, but I noticed in their credits:
The electron client is originally forked from the Club Penguin Avalanche client. The server is based in solero's works in reverse engineering the Club Penguin server (Houdini server emulator). The media server is also mostly from solero's media servers.
And that's how I found out the solution: Using CPA Client
Download the CPAvalanche Client
It runs Adode Flash x64. Easy peasy.
(the instructions are in Portuguese, but for English users:
Navigate to releases.

And download this one:

Once downloaded, open.

Drag into applications.
Run http://play.localhost through the client:
Open CPAvalanche Client. It will direct you to CPAvalance once loaded, but you're here because you want to play play.localhost.
Navigate to CPAvalanche Client next to your Apple. Click Mudar a URL do Club Penguin.

Press Sim.

URL: http://play.localhost
Ok.

Press Login once the page loads, and...

That's it! No more penguin! Have fun :)
CREDITS:
Solero Discord / Waddle Forever / Wand / CPA Client / Solero.Me
#solero/wand#wand#solero#cpps#club penguin private server#cpps localhost#club penguin#macbook#macbook silicon#mac m1#mac m2#mac m3#apple silicon
2 notes
·
View notes
Text
Introducing Codetoolshub.com: Your One-Stop IT Tools Website
Hello everyone! I'm excited to introduce you to Codetoolshub.com, a comprehensive platform offering a variety of IT tools designed to enhance your productivity and efficiency. Our goal is to provide developers, IT professionals, and tech enthusiasts with easy-to-use online tools that can simplify their tasks. Here are some of the tools we offer:
Base64 File Converter
Basic Auth Generator
ASCII Text Drawer
PDF Signature Checker
Password Strength Analyser
JSON to CSV Converter
Docker Run to Docker Compose Converter
RSA Key Pair Generator
Crontab Generator
QR Code Generator
UUID Generator
XML Formatter
And many more...
We are constantly updating and adding new tools to meet your needs. Visit Codetoolshub.com to explore and start using these powerful and free tools today!
Thank you for your support, and we look forward to helping you with all your IT needs.
2 notes
·
View notes
Text
Unleashing Efficiency: Containerization with Docker
Introduction: In the fast-paced world of modern IT, agility and efficiency reign supreme. Enter Docker - a revolutionary tool that has transformed the way applications are developed, deployed, and managed. Containerization with Docker has become a cornerstone of contemporary software development, offering unparalleled flexibility, scalability, and portability. In this blog, we'll explore the fundamentals of Docker containerization, its benefits, and practical insights into leveraging Docker for streamlining your development workflow.
Understanding Docker Containerization: At its core, Docker is an open-source platform that enables developers to package applications and their dependencies into lightweight, self-contained units known as containers. Unlike traditional virtualization, where each application runs on its own guest operating system, Docker containers share the host operating system's kernel, resulting in significant resource savings and improved performance.
Key Benefits of Docker Containerization:
Portability: Docker containers encapsulate the application code, runtime, libraries, and dependencies, making them portable across different environments, from development to production.
Isolation: Containers provide a high degree of isolation, ensuring that applications run independently of each other without interference, thus enhancing security and stability.
Scalability: Docker's architecture facilitates effortless scaling by allowing applications to be deployed and replicated across multiple containers, enabling seamless horizontal scaling as demand fluctuates.
Consistency: With Docker, developers can create standardized environments using Dockerfiles and Docker Compose, ensuring consistency between development, testing, and production environments.
Speed: Docker accelerates the development lifecycle by reducing the time spent on setting up development environments, debugging compatibility issues, and deploying applications.
Getting Started with Docker: To embark on your Docker journey, begin by installing Docker Desktop or Docker Engine on your development machine. Docker Desktop provides a user-friendly interface for managing containers, while Docker Engine offers a command-line interface for advanced users.
Once Docker is installed, you can start building and running containers using Docker's command-line interface (CLI). The basic workflow involves:
Writing a Dockerfile: A text file that contains instructions for building a Docker image, specifying the base image, dependencies, environment variables, and commands to run.
Building Docker Images: Use the docker build command to build a Docker image from the Dockerfile.
Running Containers: Utilize the docker run command to create and run containers based on the Docker images.
Managing Containers: Docker provides a range of commands for managing containers, including starting, stopping, restarting, and removing containers.
Best Practices for Docker Containerization: To maximize the benefits of Docker containerization, consider the following best practices:
Keep Containers Lightweight: Minimize the size of Docker images by removing unnecessary dependencies and optimizing Dockerfiles.
Use Multi-Stage Builds: Employ multi-stage builds to reduce the size of Docker images and improve build times.
Utilize Docker Compose: Docker Compose simplifies the management of multi-container applications by defining them in a single YAML file.
Implement Health Checks: Define health checks in Dockerfiles to ensure that containers are functioning correctly and automatically restart them if they fail.
Secure Containers: Follow security best practices, such as running containers with non-root users, limiting container privileges, and regularly updating base images to patch vulnerabilities.
Conclusion: Docker containerization has revolutionized the way applications are developed, deployed, and managed, offering unparalleled agility, efficiency, and scalability. By embracing Docker, developers can streamline their development workflow, accelerate the deployment process, and improve the consistency and reliability of their applications. Whether you're a seasoned developer or just getting started, Docker opens up a world of possibilities, empowering you to build and deploy applications with ease in today's fast-paced digital landscape.
For more details visit www.qcsdclabs.com
#redhat#linux#docker#aws#agile#agiledevelopment#container#redhatcourses#information technology#ContainerSecurity#ContainerDeployment#DockerSwarm#Kubernetes#ContainerOrchestration#DevOps
5 notes
·
View notes
Text
Docker Tutorial for Beginners: Learn Docker Step by Step
What is Docker?
Docker is an open-source platform that enables developers to automate the deployment of applications inside lightweight, portable containers. These containers include everything the application needs to run—code, runtime, system tools, libraries, and settings—so that it can work reliably in any environment.
Before Docker, developers faced the age-old problem: “It works on my machine!” Docker solves this by providing a consistent runtime environment across development, testing, and production.
Why Learn Docker?
Docker is used by organizations of all sizes to simplify software delivery and improve scalability. As more companies shift to microservices, cloud computing, and DevOps practices, Docker has become a must-have skill. Learning Docker helps you:
Package applications quickly and consistently
Deploy apps across different environments with confidence
Reduce system conflicts and configuration issues
Improve collaboration between development and operations teams
Work more effectively with modern cloud platforms like AWS, Azure, and GCP
Who Is This Docker Tutorial For?
This Docker tutorial is designed for absolute beginners. Whether you're a developer, system administrator, QA engineer, or DevOps enthusiast, you’ll find step-by-step instructions to help you:
Understand the basics of Docker
Install Docker on your machine
Create and manage Docker containers
Build custom Docker images
Use Docker commands and best practices
No prior knowledge of containers is required, but basic familiarity with the command line and a programming language (like Python, Java, or Node.js) will be helpful.
What You Will Learn: Step-by-Step Breakdown
1. Introduction to Docker
We start with the fundamentals. You’ll learn:
What Docker is and why it’s useful
The difference between containers and virtual machines
Key Docker components: Docker Engine, Docker Hub, Dockerfile, Docker Compose
2. Installing Docker
Next, we guide you through installing Docker on:
Windows
macOS
Linux
You’ll set up Docker Desktop or Docker CLI and run your first container using the hello-world image.
3. Working with Docker Images and Containers
You’ll explore:
How to pull images from Docker Hub
How to run containers using docker run
Inspecting containers with docker ps, docker inspect, and docker logs
Stopping and removing containers
4. Building Custom Docker Images
You’ll learn how to:
Write a Dockerfile
Use docker build to create a custom image
Add dependencies and environment variables
Optimize Docker images for performance
5. Docker Volumes and Networking
Understand how to:
Use volumes to persist data outside containers
Create custom networks for container communication
Link multiple containers (e.g., a Node.js app with a MongoDB container)
6. Docker Compose (Bonus Section)
Docker Compose lets you define multi-container applications. You’ll learn how to:
Write a docker-compose.yml file
Start multiple services with a single command
Manage application stacks easily
Real-World Examples Included
Throughout the tutorial, we use real-world examples to reinforce each concept. You’ll deploy a simple web application using Docker, connect it to a database, and scale services with Docker Compose.
Example Projects:
Dockerizing a static HTML website
Creating a REST API with Node.js and Express inside a container
Running a MySQL or MongoDB database container
Building a full-stack web app with Docker Compose
Best Practices and Tips
As you progress, you’ll also learn:
Naming conventions for containers and images
How to clean up unused images and containers
Tagging and pushing images to Docker Hub
Security basics when using Docker in production
What’s Next After This Tutorial?
After completing this Docker tutorial, you’ll be well-equipped to:
Use Docker in personal or professional projects
Learn Kubernetes and container orchestration
Apply Docker in CI/CD pipelines
Deploy containers to cloud platforms
Conclusion
Docker is an essential tool in the modern developer's toolbox. By learning Docker step by step in this beginner-friendly tutorial, you’ll gain the skills and confidence to build, deploy, and manage applications efficiently and consistently across different environments.
Whether you’re building simple web apps or complex microservices, Docker provides the flexibility, speed, and scalability needed for success. So dive in, follow along with the hands-on examples, and start your journey to mastering containerization with Docker tpoint-tech!
0 notes
Text
Spring AI 1.0 and Google Cloud to Build Intelligent Apps

Spring AI 1.0
After extensive development, Spring AI 1.0 provides a robust and dependable AI engineering solution for your Java ecosystem. This is calculated to position Java and Spring at the forefront of the AI revolution, not just another library.
Spring Boot is used by so many enterprises that integrating AI into business logic and data has never been easier. Spring AI 1.0 lets developers effortlessly integrate cutting-edge AI models into their apps, bringing up new possibilities. Prepare to implement smart JVM app features!
Spring AI 1.0 is a powerful and comprehensive Java AI engineering solution. Its goal is to lead the AI revolution with Java and Spring. Spring AI 1.0 integrates AI into business logic and data without the integration issues many Spring Boot-using enterprises confront. It lets developers use cutting-edge AI models in their apps, expanding possibilities.
Spring AI supports multiple AI models:
Images produced by text-command image models.
Audio-to-text transcription models.
Vectors are formed by embedding models that transform random data into them for semantic similarity search.
Chat models can edit documents and write poetry, but they are tolerant and easily sidetracked.
The following elements in Spring AI 1.0 enable conversation models overcome their limits and improve:
Use system prompts to set and manage model behaviour.
Memory is added to the model to capture conversational context and memory.
Making tool calling feasible for AI models to access external features.
Including confidential information in the request with rapid filling.
Retrieval Augmented Generation (RAG) uses vector stores to retrieve and use business data to inform the model's solution.
Evaluation to ensure output accuracy employs a different model.
Linking AI apps to other services using the Model Context Protocol (MCP), which works with all programming languages, to develop agentic workflows for complex tasks.
Spring AI integrates seamlessly with Spring Boot and follows Spring developers' convention-over-configuration setup by providing well-known abstractions and startup dependencies via Spring Initialisation. This lets Spring Boot app developers quickly integrate AI models utilising their logic and data.
When using Gemini models in Vertex AI, Google Cloud connectivity is required. A Google Cloud environment must be created by establishing or selecting a project, enabling the Vertex AI API in the console, billing, and the gcloud CLI.
Use gcloud init, config set project, and auth application-default login to configure local development authentication.
The Spring Initialiser must generate GraalVM Native Support, Spring Web, Spring Boot Actuator, Spring Data JDBC, Vertex AI Gemini, Vertex AI Embeddings, PGvector Vector Database, MCP Client, and Docker Compose Support to build a Spring AI and Google Cloud application. The site recommends using the latest Java version, especially GraalVM, which compiles code into native images instead of JRE-based apps to save RAM and speed up startup. Set application properties during configuration.characteristics for application name, database connection options, Vertex AI project ID and location for chat and embedding models (gemini-2.5-pro-preview-05-06), actuator endpoints, Docker Compose administration, and PGvector schema initialisation.
PostgreSQL database with a vector type plugin that stores data with Spring AI's VectorStore abstraction? Database schema and data can be initialised on startup using schema.sql and data.sql files, and Spring Boot's Docker Compose can start the database container automatically. Spring Data JDBC creates database interaction and data access entities.
The ChatClient manages chat model interactions and is a one-stop shop. ChatClients need autoconfigured ChatModels like Google's Gemini. Developers can create several ChatClients with different parameters and conditions using ChatClient.Builder. ChatClients can be used with PromptChatMemoryAdvisor or QuestionAnswerAdvisor to handle chat memory or VectorStore data for RAG.
Spring AI simplifies tool calls by annotating methods and arguments with @Tool and @ToolParam. The model evaluates tool relevance using annotation descriptions and structure. New default tools can be added to ChatClient.
Spring AI also integrates with the Model Context Protocol (MCP), which separates tools into services and makes them available to LLMs in any language.
For Google Cloud production deployments, Spring AI apps work with pgVector-supporting databases like Google Cloud SQL or AlloyDB. AlloyDB is built for AI applications with its high performance, availability (99.99% SLA including maintenance), and scalability.
FAQ
How is spring AI?
The Spring AI application framework simplifies Spring ecosystem AI application development. It allows Java developers to easily integrate AI models and APIs without retraining, inspired by LangChain and LlamaIndex.
Essentials and Ideas:
AI integration:
Spring AI integrates AI models with enterprise data and APIs.
Abstraction and Portability:
Its portable APIs work across vector database and AI model manufacturers.
Spring Boot compatibility:
It integrates with Spring Boot and provides observability tools, starters, and autoconfiguration.
Support the Model:
It supports text-to-image, embedding, chat completion, and other AI models.
Quick Templates:
Template engines let Spring AI manage and produce AI model prompts.
Vector databases:
It uses popular vector database providers to store and retrieve embeddings.
Tools and Function Calling:
Models can call real-time data access functions and tools.
Observability:
It tracks AI activity with observability solutions.
Assessing and Preventing Hallucinations:
Spring AI helps evaluate content and reduce hallucinations.
#SpringAI10#SpringAI#javaSpringAI#SpringBoot#AISpring#VertexAI#SpringAIandGoogleCloud#technology#technews#technologynews#news#govindhtech
0 notes
Link
#Automation#cloud#configuration#containerization#deploy#DevOps#Docker#feedaggregator#FreshRSS#Linux#Monitoring#news#open-source#Performance#Privacy#RSSreader#self-hosted#Server#systemadministration#updates#webapplication
0 notes
Text
Using Docker in Software Development

Docker has become a vital tool in modern software development. It allows developers to package applications with all their dependencies into lightweight, portable containers. Whether you're building web applications, APIs, or microservices, Docker can simplify development, testing, and deployment.
What is Docker?
Docker is an open-source platform that enables you to build, ship, and run applications inside containers. Containers are isolated environments that contain everything your app needs—code, libraries, configuration files, and more—ensuring consistent behavior across development and production.
Why Use Docker?
Consistency: Run your app the same way in every environment.
Isolation: Avoid dependency conflicts between projects.
Portability: Docker containers work on any system that supports Docker.
Scalability: Easily scale containerized apps using orchestration tools like Kubernetes.
Faster Development: Spin up and tear down environments quickly.
Basic Docker Concepts
Image: A snapshot of a container. Think of it like a blueprint.
Container: A running instance of an image.
Dockerfile: A text file with instructions to build an image.
Volume: A persistent data storage system for containers.
Docker Hub: A cloud-based registry for storing and sharing Docker images.
Example: Dockerizing a Simple Python App
Let’s say you have a Python app called app.py: # app.py print("Hello from Docker!")
Create a Dockerfile: # Dockerfile FROM python:3.10-slim COPY app.py . CMD ["python", "app.py"]
Then build and run your Docker container: docker build -t hello-docker . docker run hello-docker
This will print Hello from Docker! in your terminal.
Popular Use Cases
Running databases (MySQL, PostgreSQL, MongoDB)
Hosting development environments
CI/CD pipelines
Deploying microservices
Local testing for APIs and apps
Essential Docker Commands
docker build -t <name> . — Build an image from a Dockerfile
docker run <image> — Run a container from an image
docker ps — List running containers
docker stop <container_id> — Stop a running container
docker exec -it <container_id> bash — Access the container shell
Docker Compose
Docker Compose allows you to run multi-container apps easily. Define all your services in a single docker-compose.yml file and launch them with one command: version: '3' services: web: build: . ports: - "5000:5000" db: image: postgres
Start everything with:docker-compose up
Best Practices
Use lightweight base images (e.g., Alpine)
Keep your Dockerfiles clean and minimal
Ignore unnecessary files with .dockerignore
Use multi-stage builds for smaller images
Regularly clean up unused images and containers
Conclusion
Docker empowers developers to work smarter, not harder. It eliminates "it works on my machine" problems and simplifies the development lifecycle. Once you start using Docker, you'll wonder how you ever lived without it!
0 notes
Text
Using Docker for Full Stack Development and Deployment

1. Introduction to Docker
What is Docker? Docker is an open-source platform that automates the deployment, scaling, and management of applications inside containers. A container packages your application and its dependencies, ensuring it runs consistently across different computing environments.
Containers vs Virtual Machines (VMs)
Containers are lightweight and use fewer resources than VMs because they share the host operating system’s kernel, while VMs simulate an entire operating system. Containers are more efficient and easier to deploy.
Docker containers provide faster startup times, less overhead, and portability across development, staging, and production environments.
Benefits of Docker in Full Stack Development
Portability: Docker ensures that your application runs the same way regardless of the environment (dev, test, or production).
Consistency: Developers can share Dockerfiles to create identical environments for different developers.
Scalability: Docker containers can be quickly replicated, allowing your application to scale horizontally without a lot of overhead.
Isolation: Docker containers provide isolated environments for each part of your application, ensuring that dependencies don’t conflict.
2. Setting Up Docker for Full Stack Applications
Installing Docker and Docker Compose
Docker can be installed on any system (Windows, macOS, Linux). Provide steps for installing Docker and Docker Compose (which simplifies multi-container management).
Commands:
docker --version to check the installed Docker version.
docker-compose --version to check the Docker Compose version.
Setting Up Project Structure
Organize your project into different directories (e.g., /frontend, /backend, /db).
Each service will have its own Dockerfile and configuration file for Docker Compose.
3. Creating Dockerfiles for Frontend and Backend
Dockerfile for the Frontend:
For a React/Angular app:
Dockerfile
FROM node:14 WORKDIR /app COPY package*.json ./ RUN npm install COPY . . EXPOSE 3000 CMD ["npm", "start"]
This Dockerfile installs Node.js dependencies, copies the application, exposes the appropriate port, and starts the server.
Dockerfile for the Backend:
For a Python Flask app
Dockerfile
FROM python:3.9 WORKDIR /app COPY requirements.txt . RUN pip install -r requirements.txt COPY . . EXPOSE 5000 CMD ["python", "app.py"]
For a Java Spring Boot app:
Dockerfile
FROM openjdk:11 WORKDIR /app COPY target/my-app.jar my-app.jar EXPOSE 8080 CMD ["java", "-jar", "my-app.jar"]
This Dockerfile installs the necessary dependencies, copies the code, exposes the necessary port, and runs the app.
4. Docker Compose for Multi-Container Applications
What is Docker Compose? Docker Compose is a tool for defining and running multi-container Docker applications. With a docker-compose.yml file, you can configure services, networks, and volumes.
docker-compose.yml Example:
yaml
version: "3" services: frontend: build: context: ./frontend ports: - "3000:3000" backend: build: context: ./backend ports: - "5000:5000" depends_on: - db db: image: postgres environment: POSTGRES_USER: user POSTGRES_PASSWORD: password POSTGRES_DB: mydb
This YAML file defines three services: frontend, backend, and a PostgreSQL database. It also sets up networking and environment variables.
5. Building and Running Docker Containers
Building Docker Images:
Use docker build -t <image_name> <path> to build images.
For example:
bash
docker build -t frontend ./frontend docker build -t backend ./backend
Running Containers:
You can run individual containers using docker run or use Docker Compose to start all services:
bash
docker-compose up
Use docker ps to list running containers, and docker logs <container_id> to check logs.
Stopping and Removing Containers:
Use docker stop <container_id> and docker rm <container_id> to stop and remove containers.
With Docker Compose: docker-compose down to stop and remove all services.
6. Dockerizing Databases
Running Databases in Docker:
You can easily run databases like PostgreSQL, MySQL, or MongoDB as Docker containers.
Example for PostgreSQL in docker-compose.yml:
yaml
db: image: postgres environment: POSTGRES_USER: user POSTGRES_PASSWORD: password POSTGRES_DB: mydb
Persistent Storage with Docker Volumes:
Use Docker volumes to persist database data even when containers are stopped or removed:
yaml
volumes: - db_data:/var/lib/postgresql/data
Define the volume at the bottom of the file:
yaml
volumes: db_data:
Connecting Backend to Databases:
Your backend services can access databases via Docker networking. In the backend service, refer to the database by its service name (e.g., db).
7. Continuous Integration and Deployment (CI/CD) with Docker
Setting Up a CI/CD Pipeline:
Use Docker in CI/CD pipelines to ensure consistency across environments.
Example: GitHub Actions or Jenkins pipeline using Docker to build and push images.
Example .github/workflows/docker.yml:
yaml
name: CI/CD Pipeline on: [push] jobs: build: runs-on: ubuntu-latest steps: - name: Checkout Code uses: actions/checkout@v2 - name: Build Docker Image run: docker build -t myapp . - name: Push Docker Image run: docker push myapp
Automating Deployment:
Once images are built and pushed to a Docker registry (e.g., Docker Hub, Amazon ECR), they can be pulled into your production or staging environment.
8. Scaling Applications with Docker
Docker Swarm for Orchestration:
Docker Swarm is a native clustering and orchestration tool for Docker. You can scale your services by specifying the number of replicas.
Example:
bash
docker service scale myapp=5
Kubernetes for Advanced Orchestration:
Kubernetes (K8s) is more complex but offers greater scalability and fault tolerance. It can manage Docker containers at scale.
Load Balancing and Service Discovery:
Use Docker Swarm or Kubernetes to automatically load balance traffic to different container replicas.
9. Best Practices
Optimizing Docker Images:
Use smaller base images (e.g., alpine images) to reduce image size.
Use multi-stage builds to avoid unnecessary dependencies in the final image.
Environment Variables and Secrets Management:
Store sensitive data like API keys or database credentials in Docker secrets or environment variables rather than hardcoding them.
Logging and Monitoring:
Use tools like Docker’s built-in logging drivers, or integrate with ELK stack (Elasticsearch, Logstash, Kibana) for advanced logging.
For monitoring, tools like Prometheus and Grafana can be used to track Docker container metrics.
10. Conclusion
Why Use Docker in Full Stack Development? Docker simplifies the management of complex full-stack applications by ensuring consistent environments across all stages of development. It also offers significant performance benefits and scalability options.
Recommendations:
Encourage users to integrate Docker with CI/CD pipelines for automated builds and deployment.
Mention the use of Docker for microservices architecture, enabling easy scaling and management of individual services.
WEBSITE: https://www.ficusoft.in/full-stack-developer-course-in-chennai/
0 notes
Text
Docker MasterClass: Docker, Compose, SWARM, and DevOps
Docker has revolutionized the way we think about software development and deployment. By providing a consistent environment for applications, Docker allows developers to create, deploy, and run applications inside containers, ensuring that they work seamlessly across different computing environments. In this Docker MasterClass, we’ll explore Docker’s core components, including Docker Compose and Docker Swarm, and understand how Docker fits into the broader DevOps ecosystem.
Introduction to Docker
Docker is an open-source platform that automates the deployment of applications inside lightweight, portable containers. These containers package an application and its dependencies together, making it easy to move between development, testing, and production environments. Docker's efficiency and flexibility have made it a staple in modern software development.
Docker’s Core Components
Docker Engine
At the heart of Docker is the Docker Engine, a client-server application that builds, runs, and manages Docker containers. The Docker Engine consists of three components:
Docker Daemon: The background service that runs containers and manages Docker objects.
Docker CLI: The command-line interface used to interact with the Docker Daemon.
REST API: Allows communication with the Docker Daemon via HTTP requests.
Docker Images
Docker images are read-only templates that contain the instructions for creating a container. They include everything needed to run an application, including the code, runtime, libraries, and environment variables. Images are stored in a Docker registry, such as Docker Hub, from which they can be pulled and used to create containers.
Docker Containers
A Docker container is a running instance of a Docker image. Containers are isolated, secure, and can be easily started, stopped, and moved between environments. Because they contain everything needed to run an application, they ensure consistency across different stages of development and deployment.
Docker Compose: Managing Multi-Container Applications
Docker Compose is a tool that allows you to define and manage multi-container Docker applications. With Docker Compose, you can specify a multi-container application’s services, networks, and volumes in a single YAML file, known as docker-compose.yml.
Key Features of Docker Compose
Declarative Configuration: Define services, networks, and volumes in a straightforward YAML file.
Dependency Management: Docker Compose automatically starts services in the correct order, based on their dependencies.
Environment Variables: Easily pass environment variables into services, making configuration flexible and adaptable.
Scaling: Docker Compose allows you to scale services to multiple instances with a single command.
Docker Swarm: Orchestrating Containers
Docker Swarm is Docker’s native clustering and orchestration tool. It allows you to manage a cluster of Docker nodes as a single virtual system, simplifying the deployment and scaling of multi-container applications across multiple hosts.
Key Features of Docker Swarm
Service Discovery: Automatically discovers and loads balances services across the cluster.
Scaling: Easily scale services up or down by adding or removing nodes from the Swarm.
Rolling Updates: Perform updates to services without downtime by gradually replacing old containers with new ones.
Fault Tolerance: Redistributes workloads across the remaining nodes if a node fails.
Setting Up a Docker Swarm Cluster
To create a Docker Swarm, you need to initialize a Swarm manager on one node and then join additional nodes as workers:
bash
Copy code
# Initialize the Swarm manager docker swarm init # Add a worker node to the Swarm docker swarm join --token <worker-token> <manager-IP>:2377
Once your Swarm is set up, you can deploy a service across the cluster:
bash
Copy code
docker service create --replicas 3 --name my-service nginx:latest
This command creates a service named my-service with three replicas, distributed across the available nodes.
Docker in DevOps
Docker is an integral part of the DevOps pipeline, where it is used to streamline the process of developing, testing, and deploying applications.
Continuous Integration and Continuous Deployment (CI/CD)
In a CI/CD pipeline, Docker ensures consistency between development and production environments. Docker containers can be built, tested, and deployed automatically as part of the pipeline, reducing the likelihood of “works on my machine” issues.
Infrastructure as Code (IaC)
With Docker, infrastructure can be defined and managed as code. Dockerfiles, Docker Compose files, and Swarm configurations can be version-controlled and automated, allowing for reproducible and consistent deployments.
Collaboration and Consistency
Docker promotes collaboration between development, operations, and testing teams by providing a standardized environment. Teams can share Docker images and Compose files, ensuring that everyone is working with the same setup, from local development to production.
Advanced Docker Concepts
Docker Networking
Docker provides several networking modes, including bridge, host, and overlay networks. These modes allow containers to communicate with each other and with external networks, depending on the needs of your application.
Docker Volumes
Docker volumes are used to persist data generated by Docker containers. Volumes are independent of the container’s lifecycle, allowing data to persist even if the container is deleted or recreated.
Security Best Practices
Use Official Images: Prefer official Docker images from trusted sources to minimize security risks.
Limit Container Privileges: Run containers with the least privileges necessary to reduce the attack surface.
Regularly Update Containers: Keep your Docker images and containers up to date to protect against known vulnerabilities.
Conclusion
Docker has become a cornerstone of modern software development and deployment, providing a consistent, scalable, and secure platform for managing applications. By mastering Docker, Docker Compose, Docker Swarm, and integrating these tools into your DevOps pipeline, you can streamline your workflows, improve collaboration, and deploy applications with confidence.
Whether you're just starting out or looking to deepen your Docker knowledge, this MasterClass provides a comprehensive foundation to take your skills to the next level. Embrace the power of Docker, and transform the way you build, ship, and run applications.
0 notes
Text
The new ImageShare

ImageShare is my lightweight web app for uploading and sharing images, originally created as a replacement for the Nintendo 3DS Image Share service. It has gone through a lot of code updates and migrations over the last few years to keep it compatible with aging web browsers, and now I've rolled out another update.
The new features
ImageShare still allows you to choose an image from your device, click Upload, and get a QR code linking to the image that you can easily scan with another nearby device. It's still entirely server-side PHP, so it loads quickly, even on low-end and legacy web browsers that can no longer connect to image upload services directly.
The app previously used Imgur for all image uploads, but that API isn't always reliable, so ImageShare now fully supports ImgBB as an alternative platform. You can select which service to use from the main upload page. For security reasons, images uploaded anonymously through ImgBB are deleted after two minutes, which should be long enough to save the image after scanning the QR code.
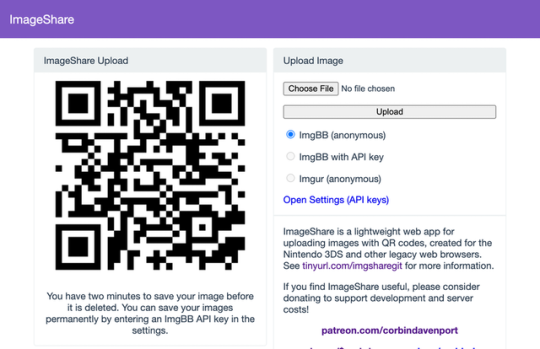
There's also a new option to use ImgBB with your own account, instead of uploading anonymously, by entering an API key in the ImageShare settings. This allows images to be saved permanently to your ImgBB account (unless you delete them later), and the images are always accessible through the ImgBB site on another web browser.
I've wanted to add authenticated image uploads for a long time, so the functionality could be closer to uploading screenshots on an Xbox or PlayStation console, but it wasn't easily doable with Imgur. Just like before, images uploaded from a Nintendo 3DS console have the game title saved with the image when it's available.

The downside is that the new API key feature doesn't work on the Nintendo 3DS Browser (and possibly the Wii U Browser, I haven't checked). As far as I can tell, Nintendo blocks any kind of permanent storage in that browser, even the simple cookies used to store the API key.
ImageShare also now has improved support for other legacy web browsers: it fully works in Netscape Navigator 6 from 2001, and possibly earlier versions. It also now has a proper icon when pinned to the Start menu on Windows 10 Mobile, and there are some more fixes for older iOS devices.

I've taken it as a challenge to support as many old web browsers and devices as possible, at least as long as it remains practical. ImageShare also now uses the goQR.me API to generate QR code images, because the deprecated Google API previously in use has stopped working entirely.
Self-hosted ImageShare
I've also done a lot of work to make ImageShare as easy to set up on a home server or production site as possible. The dev instructions are now more detailed, and more features that were previously hard-wired in the code are now optional when setting up an ImageShare instance. It's still a Docker Compose application, so it works on Windows, Mac, and Linux hosts.
The server configuration for ImageShare supports an Imgur API key, an ImgBB API key, or both. If you set up both options, the user can choose which option they want (the ImgBB option with a custom key is always available). For example, only the ImgBB option is enabled on the main server right now (I think Imgur blocked the server's IP for too many requests, so I'm giving it a break). Plausible Analytics is also now easily configurable, with reporting for page views, basic device and browser information, upload events, and so on.
I'm not aware of any other ImageShare instances, but now is as good a time as any to set one up!
The open future
ImageShare has required a lot of work to stay functional on the Nintendo 3DS and other legacy platforms. I've gone through three hosting services: first Heroku, then DigitalOcean's App Platform, then an Ubuntu VPS through Digital Ocean. After that last migration, I reworked it to run in Docker, which has made development and troubleshooting much simpler. That has all ensured ImageShare remains functional on legacy browsers through non-secure HTTP connections, while also supporting newer devices with HTTPS.
I'm not sure how long image hosting platforms will continue working with the current infrastructure, and I do not want to deal with hosting user content. There's also the issue where the main supported device, the Nintendo 3DS, can't save settings on the browser side. I'm thinking about how best to handle the project's future with those problems.
ImageShare might eventually morph into a minimal web server that runs on a computer on your home network, which would be less vulnerable to rate limiting by APIs (or could just dump images directly to a computer). Another option would be improving the self-hosted setup and publishing ImageShare to Docker Hub, where it could be installed on any computer or server with Docker in one command. This is already a popular option for NextCloud, Plex, and other local server software, so it would probably work well for ImageShare.
I don't have any plans to shut down the current ImageShare site, unless all the image hosting APIs stop working and I don't have any options left. ImageShare has already outlived the Nintendo service it was initially designed to replace, and I'd like to keep that going.
You can learn more about ImageShare from the GitHub repository, and you can try it out from theimageshare.com. If you want to help keep this service running, please consider joining my Patreon or donating through PayPal and Cash App.
1 note
·
View note
Text
🛠 Open Source Instant Messaging (IM) Project OpenIM Source Code Deployment Guide
Deploying OpenIM involves multiple components and supports various methods, including source code, Docker, and Kubernetes. This requires ensuring compatibility between different deployment methods while effectively managing differences between versions. Indeed, these are complex issues involving in-depth technical details and precise system configurations. Our goal is to simplify the deployment process while maintaining the system's flexibility and stability to suit different users' needs. Currently, version 3.5 has simplified the deployment process, and this version will be maintained for a long time. We welcome everyone to use it.
1. Environment and Component Requirements
🌐 Environmental Requirements
NoteDetailed DescriptionOSLinux systemHardwareAt least 4GB of RAMGolangv1.19 or higherDockerv24.0.5 or higherGitv2.17.1 or higher
💾 Storage Component Requirements
Storage ComponentRecommended VersionMongoDBv6.0.2 or higherRedisv7.0.0 or higherZookeeperv3.8Kafkav3.5.1MySQLv5.7 or higherMinIOLatest version
2. Deploying OpenIM Server (IM)
2.1 📡 Setting OPENIM_IP
# If the server has an external IP export OPENIM_IP="external IP" # If only providing internal network services export OPENIM_IP="internal IP"
2.2 🏗️ Deploying Components (mongodb/redis/zookeeper/kafka/MinIO, etc.)
git clone https://github.com/OpenIMSDK/open-im-server && cd open-im-server # It's recommended to switch to release-v3.5 or later release branches make init && docker compose up -d
2.3 🛠️ Compilation
make build
2.4 🚀 Starting/Stopping/Checking
# Start make start # Stop make stop # Check make check
3. Deploying App Server (Chat)
3.1 🏗️ Deploying Components (mysql)
# Go back to the previous directory cd .. # Clone the repository, recommended to switch to release-v1.5 or later release branches git clone https://github.com/OpenIMSDK/chat chat && cd chat # Deploy mysql docker run -d --name mysql2 -p 13306:3306 -p 33306:33060 -v "$(pwd)/components/mysql/data:/var/lib/mysql" -v "/etc/localtime:/etc/localtime" -e MYSQL_ROOT_PASSWORD="openIM123" --restart always mysql:5.7
3.2 🛠️ Compilation
make init make build
3.3 🚀 Starting/Stopping/Checking
# Start make start # Stop make stop # Check make check
4. Quick Validation
📡 Open Ports
IM Ports
TCP PortDescriptionActionTCP:10001ws protocol, messaging port, for client SDKAllow portTCP:10002API port, like user, friend, group, message interfacesAllow portTCP:10005Required when choosing MinIO storage (OpenIM defaults to MinIO storage)Allow port
Chat Ports
TCP PortDescriptionActionTCP:10008Business system, like registration, login, etc.Allow portTCP:10009Management backend, like statistics, account banning, etc.Allow port
PC Web and Management Backend Frontend Resource Ports
TCP PortDescriptionActionTCP:11001PC Web frontend resourcesAllow portTCP:11002Management backend frontend resourcesAllow port
Grafana Port
TCP PortDescriptionActionTCP:13000Grafana portAllow port
Verification
PC Web Verification
Note: Enter http://ip:11001 in your browser to access the PC Web. This IP should be the server's OPENIM_IP to ensure browser accessibility. For first-time use, please register using your mobile phone number, with the default verification code being 666666.
App Verification
Scan the following QR code or click here to download.

Note: Double-click on OpenIM and change the IP to the server's OPENIM_IP then restart the App. Please ensure related ports are open, and restart the App after making changes. For first-time use, please register first through your mobile phone number, with the default verification code being 666666.


5. Modifying Configuration Items
5.1 🛠️ Modifying Shared Configuration Items
Configuration ItemFiles to be ModifiedActionmongo/kafka/minio related.env, openim-server/config/config.yamlRestart components and IMredis/zookeeper related.env, openim-server/config/config.yaml, chat/config/config.yamlRestart components, IM, and ChatSECRETopenim-server/config/config.yaml, chat/config/config.yamlRestart IM and Chat
5.2 🔄 Modifying Special Configuration Items
Special configuration items: API_OPENIM_PORT/MINIO_PORT/OPENIM_IP/GRAFANA_PORT
Modify the special configuration items in the .env file
Modify the configuration in openim-server/config/config.yaml according to the rules
Modify the configuration in chat/config/config.yaml according to the rules
Restart IM and Chat
5.3 🛠️ Modifying Other Configuration Items
For other configuration items in .env, chat/config/config.yaml, and openim-server/config/config.yaml, you can modify these items directly in the respective files.
5.4 Modifying Ports
Note that for any modification of IM-related ports, it's necessary to synchronize the changes in open-im-server/scripts/install/environment.sh.
6. Frequently Asked Questions
6.1 📜 Viewing Logs
Runtime logs: logs/OpenIM.log.all.*
Startup logs: _output/logs/openim_*.log
6.2 🚀 Startup Order
The startup order is as follows:
Components IM depends on: mongo/redis/kafka/zookeeper/minio, etc.
IM
Components Chat depends on: mysql
Chat
6.3 🐳 Docker Version
The new version of Docker has integrated docker-compose.
Older versions of Docker might not support the gateway feature. It's recommended to upgrade to a newer version, such as 23.0.1.
7. About OpenIM
Thanks to widespread developer support, OpenIM maintains a leading position in the open-source instant messaging (IM) field, with the number of stars on Github exceeding 12,000. In the current context of increasing attention to data and privacy security, the demand for IM private deployment is growing, which aligns with the rapid development trend of China's software industry. Especially in government and enterprise sectors, with the rapid development of information technology and the widespread application of innovative
industries, the demand for IM solutions has surged. Further, the continuous expansion of the collaborative office software market has made "secure and controllable" a key attribute.
Repository address: https://github.com/openimsdk
1 note
·
View note
Text
Docking Your Workflow: A Hands-On Guide to Docker Compose Installation and Examples

What is docker-compose?
It is a tool which is used to create and start Docker application by using a single command.
It simplifies the deployment of complex applications by defining their architecture in a human-readable format.
This configuration file, typically written in YAML, outlines the services, networks, and volumes needed to run your application.
Docker Compose not only simplifies the management of containers but also encourages collaboration among developers and teams
Users can activate all the services (containers) using a single command.
Docker compose features
Purpose:Orchesrating multi-container application
Configuration:YAML base configuration
Scale:Multiple containers
Networking:Built-in networking and service discovery
Dependancy:Images and compose configuration
Ecosystem:Docker Hub and private registries
How to Install Docker Compose
Prerequisites:
Before installing Docker Compose, ensure that you have Docker installed on your system.
Installation Steps:
Check the Current Release:
Visit the Docker Compose GitHub release page to find the latest stable release. Identify the version number you want to install.
Download the Docker Compose Binary:
sudo curl -L "https://github.com/docker/compose/releases/download/1.23.2/docker-compose-$(uname -s)-$(uname -m)" -o /usr/local/bin/docker-compose

Apply Executable Permissions:
Make the downloaded binary executable:
sudo chmod +x /usr/local/bin/docker-compose

Verify Installation:
Confirm the successful installation by checking the version:
docker-compose –version

Docker Compose Commands:
docker-compose build =Look for all services containing the build
docker-compose run=Run a one-time command against a service
docker-compose up=Command used to start all the services of the container.
docker Compose down=This syntax is used to stop all the services that were started.
docker-compose -f =Specify the location of a docker-compose configuration file by adding the -f flag
docker-compose start=Start existing containers for a service
docker_compose_v=To check the version of docker-compose, we use this command.
docker ps=This command is used to bring out the whole process of Docker.
docker Compose.yml=This command is used to configure application services using YAML files.
docker-compose up -d=Used to run a Docker-Compose file.
docker Compose up -d -scale=Used to scale the service of the container.
pip install -U Docker-compose= Command used to install Docker Compose using pip.
Compose step process
1 Create a Directory
Creating the Dockerfile for the app environment
defining the services in docker-compose.yml
starting the application
Running Application using Docker Compose
Example:
Follow the following example
1) Create a Directory
mkdir docker-compose-praman

2)Go to the directory
cd docker-composer-praman

3) Define docker-compose.yml file
sudo vi docker-compose.yml
let’s dismantle the above code and understand it by piece:
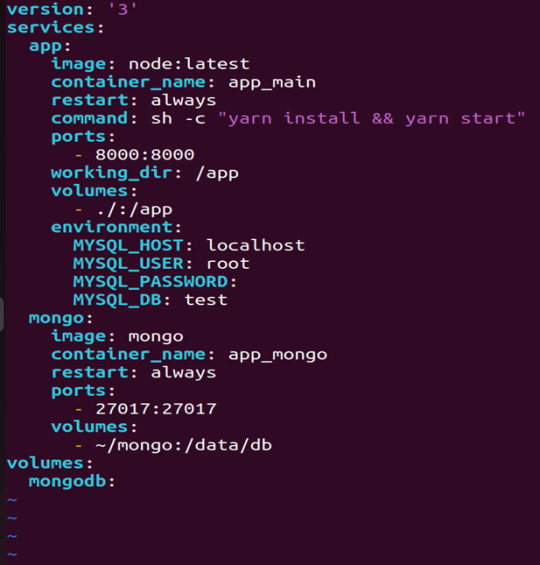
version: It refers to the docker-compose version (Latest 3)
services: It defines the services that we need to run
app: It is a custom name for one of your containers
image: The image which we have to pull. Here we are using node:latest and mongo
container_name: It is the name for each container
restart: starts/restarts a service container
port: It defines the custom port to run the container
working_dir: It is the current working directory for the service container
environment: It defines the environment variables, such as DB credentials, and so on
command: It is the command to run the service
4)How to run the multi-container:
We need to build our multi-container using docker build.
docker-compose build (Command to build the docker-compose.yml)

docker-compose up (Command to run multiple containers using docker-compose)
docker-compose up -d (Command to run multiple containers using docker-compose in detached mode)
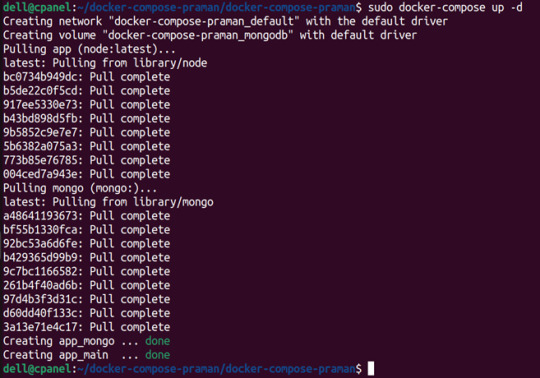
docker-compose ps (Command to list the running container services)

Sample output for running mongodb service using docker:

Docker Compose Disadvantages:
Below are the drawbacks of Docker-Compose.
1.You have to spend more time and effort, installing Docker on your server.
2.Docker-Compose requires manual updates and fails when it comes to rebooting.
3.You have to spend more time and effort, installing Docker on your server.
4. However, docker-compose is already there in your system if you have installed Docker.
Docker Compose Use Cases:
Automated testing environments-
Compose supports automated testing, which is an essential part of CI/CD as it can easily create and destroy the required testing environment
Single host deployments-
In Docker Compose, containers are designed to run on a single host as they have traditionally been focused on development and testing workflows.
Development Environments-
Compose is a fast and simple way of starting projects as it can quickly spin up new isolated development environments.
High productivity -
Docker-Compose increases productivity and reduces the time taken for each task
Security -
All the containers are isolated from each other, reducing the threat landscape
Configuration-
Docker-Compose files are written in YAML scripts hence, provide easy and quick configuration.
Credits - Sachin Auti (DevOps)
MetricsViews Pvt. Ltd.
MetricsViews specializes in building a solid DevOps strategy with cloud-native including AWS, GCP, Azure, Salesforce, and many more. We excel in microservice adoption, CI/CD, Orchestration, and Provisioning of Infrastructure - with Smart DevOps tools like Terraform, and CloudFormation on the cloud.
www.metricsviews.com
0 notes
Text
youtube
Dockge: A New Way To Manage Your Docker Containers
Dockge is a self-hosted Docker stack manager, designed to offer a simple and clean interface for managing multiple Docker compose files. It has been developed by the same individual responsible for creating Uptime Kuma, a popular software for monitoring uptime
Dockge is described as an easy-to-use, and reactive self-hosted manager that is focused on Docker compose.yaml stack orientation. It features an interactive editor for compose.yaml, an interactive web terminal, and a reactive UI where everything is responsive, including real-time progress and terminal output.
It allows for the management of compose.yaml files, including creating, editing, starting, stopping, restarting, and deleting, as well as updating Docker images. The user interface is designed to be easy to use and visually appealing, especially for those who appreciate the UI/UX of Uptime Kuma.
Additionally, Dockge can convert docker run … commands into compose.yaml and maintains a file-based structure, meaning that compose files are stored on the user's drive as usual and can be interacted with using normal docker compose commands.
The motivation behind Dockge's development includes dissatisfaction with existing solutions like Portainer, especially regarding stack management. Challenges with Portainer included issues like indefinite loading times when deploying stacks and unclear error messages. The developer initially planned to use Deno or Bun.js for Dockge's development but ultimately decided on Node.js due to lack of support for arm64 in the former technologies.
In summary, Dockge is a versatile and user-friendly tool for managing Docker stacks, offering a responsive and interactive environment for Docker compose file management. Its development was driven by a desire to improve upon existing tools in terms of usability and clarity.
Resource links:
Github: https://github.com/louislam/dockge
FAQ: https://github.com/louislam/dockge#faq
#youtube#education#free education#windows10#Docker Containers#docker course#docker tutorials#docker apps#Docker#github
0 notes
Text
Quadlets might make me finally stop using Docker-compose – Major Hayden
https://major.io/p/quadlets-replace-docker-compose/
0 notes